Basics of JavaScript
Recall from the pre-lab reading that a webpage is like a house:
- HTML is the scaffolding/foundation of the house
- CSS is the paint, carpets, etc. that makes the house look nice
- JavaScript is the appliances that adds function to the house
Why start with HTML and CSS first?
In order to do any JavaScript coding, you need to make sure your content has a place to show up!
What is JavaScript?
JavaScript is like the scriptwriter behind the scenes, turning static web pages into dynamic, interactive stories that captivate the audience. While there are various frameworks like React.js and Vue.js that offer additional features, this class will focus on the basics of JavaScript, also known as “vanilla” JavaScript, following the ES6+ standards. Learn more about ES6+ standards here.
In HTML, we use <script> tags to include JavaScript code. These tags can be placed in two main spots:
- Inside the
<head>section: JavaScript here loads before anything else on the page. This is a good spot for scripts that need to set things up before the page shows to the user. - Inside the
<body>section or right before the closing</body>tag: This is where you typically put JavaScript that affects the content of the page. Since it loads after the HTML, it ensures all your page elements are loaded before the script tries to interact with them.
For our purposes, especially when working with libraries like MapLibreGL.js, it’s important to load the library first. This means placing the MapLibreGL.js script in the <head> to ensure it’s loaded and ready to go. Our custom JavaScript, which might interact with or initialize the map, should come later, ideally at the end of the <body> section. You can even place it in a <footer> tag to keep things organized and ensure it loads at the right time.
Remember, the order in which scripts are loaded can make or break your webpage- imagine putting the ending of a mystery movie at the beginning!
It’s a me Lego Var-io
Variables are like boxes that hold information, try to think of them as the building blocks of the instructions.
Variables are the Lego blocks of programming and can be numbers, text, or even collections of other variables! In programming languages we call variables can be classified into types. In order to use a variable, you have to declare variables. With JavaScript, variables are automatically assigned types based on their declaration.
In JavaScript all declarations and lines should end with a semicolon ;, which is like a . (period) in English that says, my statement is done.
These are examples of a declaration:
In front you see the var keyword that tells the web browser, “Hey this is a variable!”. In this example, day is a numeric type with a value of 8 and name is a string type. Each type has certain properties and uses, for example you can add numbers together using something like day + day, but you adding strings will simply concatenate and not total them.
What is a keyword?
In most coding languages, a keyword is a word that tells a program to treat the following text, numbers, or characters in a specific way. For example, var myName says treat myName as a variable. This means you CANNOT name a variable var, Jar Jar Binks cousin Var Var Binks is VARy bad for JavaScript to see! i.e. var var Also note, you cannot use spaces in variable names!
Some more variable definitions
What we really need to understand about variables is that they act like boxes where you can store or take information out of.
- const acts like a locked safe that will not let you put anything into it after you define it
- let is like a regular box.
- var is VARy problematic because it can be both locked and unlocked
Here are some of the types in JavaScript:
//number
let box1 = 5;
let box2 = 5.0;

//string
let box3 = 'five';
let box4 = "five";

// string literal, uses backticks and ${variable} to bring in another variable
let box5 = `this is from box #4: ${box4}`;

// array
let box6 = [1,2,3,4,5];

// object, stores variables together, can be of different types!
let box7 = {"number": 'five', "value":5};

// boolean (true or false)
let box8 = true;

// null value
let emptyBox;
Remember, to declare a variable (give it a value) you must use the = symbol, like so:
Anatomy of a variable declaration
letis the keyword declaration of a variablemy_variableis the variable’s name"exist!"is the value for this variable;defines the end of a line in JavaScript
LET’s a go!
With JavaScript ES6, let and const keywords were introduced to declare variables. This change means that the recommend practice is to no longer use the var keyword. let and const variables get declared in the same way:
- The
letkeyword LETS a variable CHANGE!
- The
constkeyword declaration keeps a variable CONSTant!
Let vs Const vs Var
What is the difference?
- The
letkeyword declaration LETS a variable change - The
constkeyword delcaration a variable CONSTant and will never change. - The
varallows varaibles to change or never change depending on where it was declared! VERY PROBLEMATIC!
Because var can be changing (mutable) and unchanging at the same time, so var was changed into off into two different variable types, let and const.
Scopes: Local vs. Global
Where you declare a variable sets the scope to either a local one (limited to a function or area in the code) or global (can be accessed by anything/anywhere else in the code).
So, bye bye var and LET us welcome our new CONST variables to the JavaScript programming world.
TLDR
DO NOT USE var unless you need to code for Internet Explorer.
Console.log()
By itself, our script tag does nothing. So, one VERY helpful JavaScript tool (method) that we should familarize ourself with is console.log(), because it allows us to test our code.
Add the following script:
Nothing happened?! What!?
Actually, you are about to unlock your full web developer potential!
In Firefox, right click anywhere on the page and the click Inspect Element:
 This opens the
 Developer Toolbar!! You can find it by going to the Menu and going to Web Developer and then Web Developer Tools.
Click on the Console button:

Yay! Our message is there!

Linking to another JavaScript file
Similar to the CSS files, we can move the JavaScript file into its own folder to avoid cluttering the HTML file. Importing libraries is the main way we level up our webpage.
BUT!!! Instead of <link> we use the <script> tag:
The src attribute is location of your file.
In-class Exercise #2
Task:
- Create a new folder called
js- Add our script in there
- Get our message to show up in the console
Answer
1. Click on the `New Folder` button: 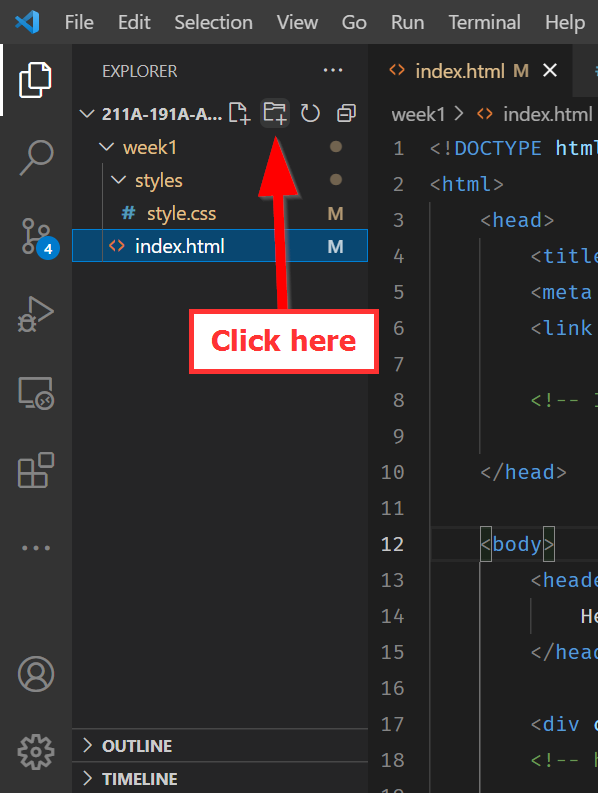 2. Type in `js`: 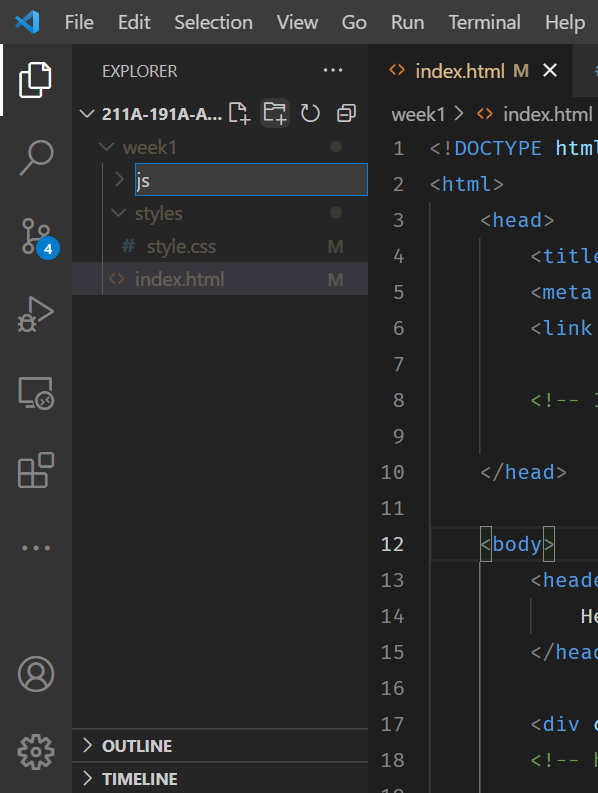 3. Click on the `New File` button: 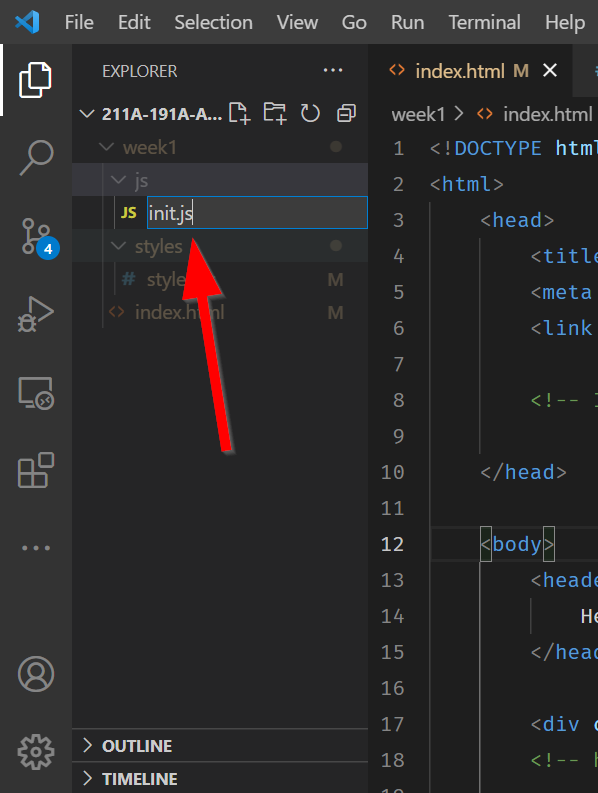 4. Give it a name, like `init.js`  5. Within `index.html` before the end of the `` element include the following:Hint
Never include <script></script> tags inside of a Javascript file, those are HTML elements!!!
Hello MapLibreGL… Finally..
OK, why did we do ALL of that? Well, when we use MapLibreGL, we actually need to bring in MapLibreGL’s JavaScript files!
So, in our header, let’s add the following:
<!-- MapLibreGL's JavaScript-->
<script src="https://unpkg.com/maplibre-gl/dist/maplibre-gl.js"></script>
Now, let’s go ahead and add a container for our map.
Notice in <div id="main"></div> that there is a map div after our portfolio section:
That is the container for the map!
Open up the JavaScript file again and add the following MapLibreGL code template:
// Initialize the map
const map = new maplibregl.Map({
    container: 'map', // container ID
    style: 'https://api.maptiler.com/maps/streets/style.json?key=wsyYBQjqRwKnNsZrtci1', // Your style URL
    center: [ -118.444, 34.0709], // Starting position [lng, lat]
    zoom: 15 // Starting zoom level
});

// Add a marker to the map
new maplibregl.Marker()
    .setLngLat([ -118.444, 34.0709])
    .setPopup(new maplibregl.Popup({ offset: 25 }) // Add popups
        .setHTML('Math Sciences 4328 aka the Technology Sandbox<br> is the lab where I used to work in '))
    .addTo(map);
Class Exercise #3 - Adding more markers
- Looking at the code above a little bit, we can see some latitude/longitude pairs. Copy the marker code add more markers of your choosing. Note: Be sure give the marker variable a new name, like
marker2. - To find latitude/longitude of coordinates, please use this website:
- https://www.latlong.net/
🏁Checkpoint
- Your
index.htmlshould have a<div>with an ID ofmap - Your
init.jsshould have the MapLibreGL code template - Your
init.jsshould be linked in yourindex.htmlfile
Check your work
Check to see if your code looks likes the following before moving on:
// Initialize the map
const map = new maplibregl.Map({
    container: 'map', // container ID
    style: 'https://api.maptiler.com/maps/streets/style.json?key=wsyYBQjqRwKnNsZrtci1', // Your style URL
    center: [ -118.444, 34.0709], // Starting position [lng, lat]
    zoom: 15 // Starting zoom level
});

// Add a marker to the map
new maplibregl.Marker()
    .setLngLat([ -118.444, 34.0709])
    .setPopup(new maplibregl.Popup({ offset: 25 }) // Add popups
        .setHTML('Math Sciences 4328 aka the Technology Sandbox<br> is the lab where I used to work in '))
    .addTo(map);